FlexGrid FlexGrid에 인라인 편집을 추가하는 방법
페이지 정보
작성자 GrapeCity 작성일 2021-04-06 15:16 조회 894회
댓글 0건
작성일 2021-04-06 15:16 조회 894회
댓글 0건
본문
관련링크
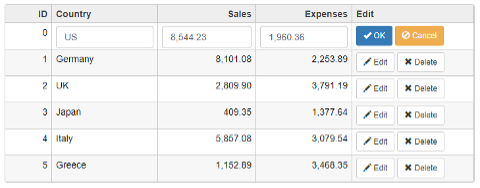
FlexGrid 컨트롤은 기본적으로 Excel 스타일의 효율적인 스타일 편집 기능을 제공하지만, 그리드의 편집 동작을 사용자 정의하려는 경우도 있습니다. Excel 스타일 편집을 사용하지 않고 FlexGrid 행에 편집 버튼을 추가하려면 formatItem 이벤트와 약간의 코드를 사용하면 됩니다.
Wijmo는 와 함께 , , , , , , , , /, , 등의 기능을 제공합니다.

FlexGrid용 필수 모듈을 가져오는 방법
FlexGrid 컨트롤을 생성하려면 먼저 JavaScript 파일에 필수 Wijmo 파일을 가져와야 합니다.
(자바스크립트 SystemJS 모듈 기반으로 작성되었습니다.)
import ‘@grapecity/wijmo.styles/wijmo.css’;
import * as wjCore from ‘@grapecity/wijmo’;
import * as wjGrid from ‘@grapecity/wijmo.grid’;
위의 코드는 Wijmo의 기본 JavaScript 모듈과 FlexGrid 모듈을 가져오며, Wijmo의 CSS 파일도 포함하고 있기 때문에 컨트롤 스타일을 올바르게 지정할 수 있습니다
FlexGrid 컨트롤 생성하기
먼저, FlexGrid를 생성해 보겠습니다. 또한 FlexGrid 컨트롤에 두 가지 이벤트, 즉 formatItem 이벤트와 click 이벤트를 연결하겠습니다.
var theGrid = new wjGrid.FlexGrid(‘#theGrid’, {
isReadOnly: true,
selectionMode: ‘None’,
headersVisibility: ‘Column’,
itemsSource: data,
columns: [...],
});
theGrid.formatItem.addHandler(function(s,e){...});
theGrid.addEventListener(theGrid.hostElement, ‘click’, function(e)
{...});이 이벤트들은 나중에 블로그에서 다시 볼 수 있습니다. 그 전에 이벤트에서 사용할 버튼을 만들어야 합니다.
인라인 편집 버튼 추가하기
다음으로, 그리드가 인라인 편집에 사용할 버튼 템플릿을 만들어야 합니다. 두 개의 버튼 집합 모두 "display:none"으로 설정됩니다. 이 버튼은 JavaScript에서 사용할 템플릿이기 때문에 그 전에 화면에 표시되지 않도록 해야 합니다.
<!-- template for buttons on items in view mode --> <div id="tplBtnViewMode" style="display:none"> <button id="btnEdit" class="btn btn-default btn-sm"> <span class="glyphicon glyphicon-pencil"></span> Edit </button> <button id="btnDelete" class="btn btn-default btn-sm"> <span class="glyphicon glyphicon-remove"></span> Delete </button> </div> <!-- template for buttons on items in edit mode --> <div id="tplBtnEditMode" style="display:none"> <button id="btnOK" class="btn btn-primary btn-sm"> <span class="glyphicon glyphicon-ok"></span> OK </button> <button id="btnCancel" class="btn btn-warning btn-sm"> <span class="glyphicon glyphicon-ban-circle"></span> Cancel </button> </div>
인라인 편집 구현하기
이제 FlexGrid를 만들었고 버튼 템플릿이 생성되었으므로 그리드에 연결된 이벤트에 코드를 추가하여 인라인 편집을 구현할 수 있습니다. FormatItem 이벤트는 FlexGrid에 표시되는 내용을 처리하는 반면, 'click' 이벤트 수신기는 버튼의 click 이벤트를 처리합니다.
// custom formatter to paint buttons and editors
theGrid.formatItem.addHandler(function (s, e) {
if (e.panel == s.cells) {
var col = s.columns[e.col], item = s.rows[e.row].dataItem;
if (item == currentEditItem) {
// create editors and buttons for the item being edited
switch (col.binding) {
case 'buttons':
e.cell.innerHTML = document.getElementById('tplBtnEditMode').innerHTML;
e.cell['dataItem'] = item;
break;
case 'country':
case 'sales':
case 'expenses':
e.cell.innerHTML = '<input class="form-control" ' +
'id="' + col.binding + '" ' +
'value="' + s.getCellData(e.row, e.col, true) + '"/>';
break;
}
}
else {
// create buttons for items not being edited
switch (col.binding) {
case 'buttons':
e.cell.innerHTML = document.getElementById('tplBtnViewMode').innerHTML;
e.cell['dataItem'] = item;
break;
}
}
}
});
// handle button clicks
theGrid.addEventListener(theGrid.hostElement, 'click', function (e) {
let targetBtn;
if (e.target instanceof HTMLButtonElement) {
targetBtn = e.target;
}
else if (e.target instanceof HTMLSpanElement && e.target.classList.contains('glyphicon')) {
targetBtn = e.target.parentElement;
}
if (targetBtn) {
// get button's data item
var item = wjCore.closest(targetBtn, '.wj-cell')['dataItem'];
// handle buttons
switch (targetBtn.id) {
// start editing this item
case 'btnEdit':
editItem(item);
break;
// remove this item from the collection
case 'btnDelete':
theGrid.collectionView.remove(item);
break;
// commit edits
case 'btnOK':
commitEdit();
break;
// cancel edits
case 'btnCancel':
cancelEdit();
break;
}
}
});click 이벤트 내에서 editItem(), commitEdit() 및 cancelEdit()라는 사용자 정의 함수를 몇 개 볼 수 있습니다. 이 함수들은 사용자가 클릭하는 버튼에 따라 호출되며, 사용자의 선택에 따라 FlexGrid가 업데이트됩니다.
var currentEditItem = null;
function editItem(item) {
cancelEdit();
currentEditItem = item;
theGrid.invalidate();
}
function commitEdit() {
if (currentEditItem) {
  theGrid.columns.forEach(function (col) {
    var input = theGrid.hostElement.querySelector('#' + col.binding);
    if (input) {
      var value = wjCore.changeType(input.value, col.dataType, col.format);
      if (wjCore.getType(value) == col.dataType) {
        currentEditItem[col.binding] = value;
      }
    }
  });
}
currentEditItem = null;
theGrid.invalidate();
}
function cancelEdit() {
if (currentEditItem) {
  currentEditItem = null;
  theGrid.invalidate();
}
}
마지막으로 해야 할 작업이 있습니다. FlexGrid 컨트롤 내부에 배치되는 버튼과 입력 컨트롤은 셀이 배치될 셀보다 약간 더 큽니다. 따라서 행의 높이를 높여야 합니다.
theGrid.rows.defaultSize = 40;
다 끝났습니다! 이제 FlexGrid는 그리드에 배치된 버튼을 통해 인라인 편집을 지원합니다.
이 샘플을 실시간으로 확인하실 수 있습니다.
댓글목록
등록된 댓글이 없습니다.