SpreadJS에 AutoComplete 구현하기
페이지 정보
작성자 GrapeCity 작성일 2021-06-04 15:34 조회 1,971회
댓글 0건
작성일 2021-06-04 15:34 조회 1,971회
댓글 0건
본문
관련링크
이러한 개념을 쉽게 구현할 수 있도록 SpreadJS에서는 버튼, 콤보 상자, 체크박스, 라디오 버튼 등을 비롯하여 다양한 셀 유형을 만드는 CellTypes 사용을 지원합니다. 데모에는 JavaScript 스프레드시트 내에서 여러 기능을 활용하기 위해 여러 가지 새로운 셀 유형을 만들 수 있는 CustomCellType이 있습니다.
이 블로그에서는 자동 완성 드롭다운 목록을 구현하기 위해 를 사용하는 사용자 정의 AutoCompleteCellType을 만드는 데 CellTypes 개념을 사용하는 방법을 살펴볼 것입니다. 이름에서 알 수 있듯, 편집 모드에서 AutoCompleteCellType을 셀에 적용하면, 사용자가 입력을 시작하여 드롭다운 상자에서 값 목록을 채울 수 있습니다. 사용자는 여러 옵션 중 셀 값으로 설정할 옵션 하나를 선택할 수 있습니다. 옵션은 Select2 라이브러리에서 자동으로 채워져 표시되므로, 사용자는 ajax 메서드를 사용하여 원격 데이터베이스에 연결할 수 있습니다.
다음과 같이 스프레드시트에서 셀을 만드는 간단한 예로 시작해 보겠습니다.
nutshell에서 다음 작업을 수행합니다.
- AutoCompleteCellType 구현
- 편집기 요소 만들기
- 캔버스에서 셀 칠하기
- 편집기 활성화 및 비활성화
- 편집기 값 가져오기 및 설정
- 예약된 키보드 키 처리
시작하기:
// 1. Implement the AutoCompleteCellType custom cell using the Base class
    AutoCompleteCellType.prototype = new GC.Spread.Sheets.CellTypes.Base();
2. 편집기 요소 만들기
먼저, div 요소를 만들고 속성이 설정된 select 요소를 추가하여 편집기 요소를 만듭니다. 그런 다음, SpreadJS 메서드를 사용하여 새 편집기에 셀의 너비 및 높이를 적절하게 표시합니다.
마지막으로, select2에서 이벤트 수신기를 추가하고 결과를 선택하면 SpreadJS가 메서드를 사용하여 활성 셀 편집을 중지합니다. 또한 select2 드롭다운이 열리면 select2-dropdown에 대한 속성이 설정됩니다.
// 2. Create the editor
AutoCompleteCellType.prototype.createEditorElement = function (context) {
var editor;
// 2.1) Create a div element to appear as the editor
editor = document.createElement('div')
// 2.2) Set the editors attributes and append a select element
editor.setAttribute("gcUIElement", "gcEditingInput");
editor.appendChild(document.createElement('select'));
editor.children[0].style.width = "100%";
editor.children[0].style.height = "100%";
// 2.3) Get the cells width and height to set the width and height of the editor
var cellRect = context.sheet.getCellRect(context.row, context.col);
editor.style.width = cellRect.width + 'px';
editor.style.height = cellRect.height + 'px';
// 2.4) Whenever a result is selected from the select2 dropdown, end editing on SJS's cell
$(editor).find('select').on('select2:select', function (e) {
  context.sheet.endEdit();
});
// 2.5) Whenever the select2 dropdown is opened, set the attributes of the dropdown
$(editor).find('select').on('select2:open', function (e) {
  $('.select2-dropdown').attr("gcUIElement", "gcEditingInput");
});
return editor;
}
3. 캔버스에서 셀 칠하기
SpreadJS 기본 클래스의 메서드를 사용하여 캔버스에서 셀을 칠합니다. 이 예에서는 ID와 값을 사용하고 드롭다운에서 선택한 항목에 따라 해당 ID와 값을 표시합니다.
// 3. Paint a cell on the canvas
AutoCompleteCellType.prototype.paint = function (ctx, value, x, y, w, h, style, options) {
if (value) {
  GC.Spread.Sheets.CellTypes.Base.prototype.paint.apply(this, [ctx, value.id + ": " + value.value, x, y, w, h, style, options]);
}
};
4. 편집기 활성화 및 비활성화
다음으로, 메서드를 사용하여 편집기를 활성화 및 검색하고 검색된 결과를 처리하는 방법을 보여드리겠습니다. 합니다. 이 메서드는 검색어를 기준으로 선택 드롭다운에 원격 데이터 소스를 추가하는 데 사용됩니다. 이 작업을 완료하려면 먼저 select2 요소를 찾고 ajax 호출을 사용하여 원격 데이터 소스를 지정된 URL에 추가합니다. 그런 다음 결과를 select2가 인식할 수 있는 형식으로 처리합니다. 이 예에서는 항목의 국가 name 및 numericCode를 반환합니다.
// 4. Activate and Deactivate the editor
AutoCompleteCellType.prototype.activateEditor = function (eContext, cellStyles, cellRect) {
      // 4.1) Find select2 element add a remote data source
      $(eContext).find('select').select2({
        ajax: {
          url: "https://raw.githubusercontent.com/kshkrao3/JsonFileSample/master/select2resp.json",
          dataType: 'json',
          delay: 250,
          // 4.2) return the search term
          data: function (params) {
            return {
              q: params.term // search term
            };
          },
          // 4.3) Process the results into the format expected by Select2
          processResults: function (data, params) {
            var resData = [];
            data.forEach(function (value) {
              if (value.name.indexOf(params.term) != -1)
                resData.push(value)
            })
            return {
              results: $.map(resData, function (item) {
                return {
                  text: item.name,
                  id: item.numericCode
                }
              })
            };
          },
          cache: true
        },
        minimumInputLength: 1,
      });
편집기를 비활성화하려면 SpreadJS 메서드를 사용하고 select2 라이브러리 를 사용하여 select2 위젯을 제거합니다.
AutoCompleteCellType.prototype.deactivateEditor = function (eContext, context) {
      // 4.4) Remove the select2 widget
      $(eContext).find('select').select2('destroy');
    }
5. 편집기 값 가져오기 및 설정
SpreadJS 메서드는 편집기 값을 수신하고 ID 및 텍스트를 ID 및 값으로 할당합니다. 그런 다음 를 사용하여 편집기의 값을 설정하고 선택한 항목을 반환된 ID 및 값과 함께 추가합니다.
// 5. Get and set the Editor Value
// 5.1) get the editor value and assign the id and text as the id and value
AutoCompleteCellType.prototype.getEditorValue = function (eContext) {
var data = $(eContext).find('select').select2('data');
if (!data || !data.length) {
  return null;
}
return Object.assign({}, {
  id: data[0].id,
  value: data[0].text
});
}
// 5.2) Set the editor value with an option that uses the returned value and id and appends it to the select element
AutoCompleteCellType.prototype.setEditorValue = function (eContext, val) {
if (!val) {
  return;
}
var op = new Option(val.value, val.id, true, true);
$(eContext).find('select').append(op).trigger('change');
}
6. 예약된 키보드 키 처리
사용자가 입력하고 결과가 선택 드롭다운을 채우면 SpreadJS는 키보드 화살표 키와 Escape 키를 처리해야 합니다. 이렇게 하려면 SpreadJS 메서드를 사용합니다. 이 메서드는 셀 유형이 키보드 이벤트를 처리하는지 여부를 결정하는 데 사용됩니다. 이 경우에는 down, up, End, Escape 키를 나타내는 키코드 번호 40, 38, 13, 27을 사용합니다.
// 6. Handle reserved keyboard keys
    AutoCompleteCellType.prototype.isReservedKey = function (e, context) {
      if (context.isEditing && (e.keyCode == 40 || e.keyCode == 38 || e.keyCode == 13 || e.keyCode == 27)) {
        return true;
      }
      return GC.Spread.Sheets.CellTypes.Text.prototype.isReservedKey.apply(this, arguments);
    }
결과:
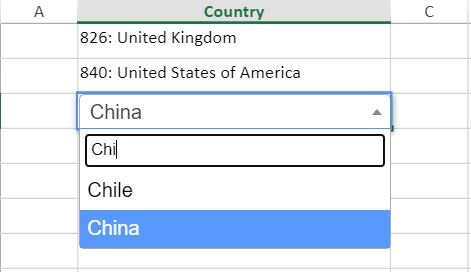
이 코드 로직이 적용되면 사용자는 셀 또는 셀 범위에 셀 유형을 설정할 수 있습니다. 아래에서는 사용자 정의 autoCompleteCellType으로 설정합니다.
sheet.getRange(-1, 1, -1, 1).cellType(new AutoCompleteCellType()).width(250);
sheet.getCell(2, 1, GC.Spread.Sheets.SheetArea.viewport).cellType(new AutoCompleteCellType()).value({
id: 123,
value: "Enter Value"
});사용자가 autoCompleteCellType이 적용된 셀에 값을 입력하면 새 편집기가 나타나고 입력한 내용에 따라 드롭다운이 자동으로 채워집니다.
코드샌드박스에서 실제 코드를 확인해 보실 수 있습니다.
이 링크는 사용자 정의 셀 유형을 생성하는 데 사용되는 SpreadJS의 사용자 정의 옵션의 한 가지 예에 불과합니다. SpreadJS의 JavaScript API를 사용하면 필요에 맞게 JavaScript 스프레드시트에 사용자 정의된 동작을 추가할 수 있습니다. 개발자는 (여기서 를 구현한 것과 유사하게) 여러 라이브러리를 구현하여 요구 사항에 따라 여러 동작도 수행할 수 있습니다.

댓글목록
등록된 댓글이 없습니다.